

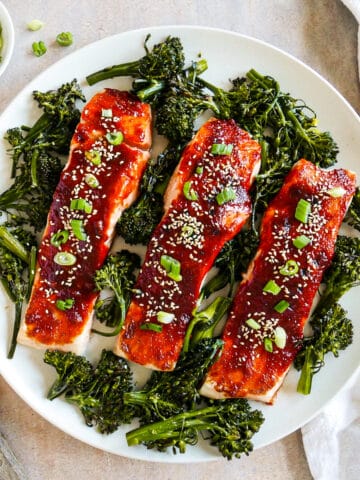
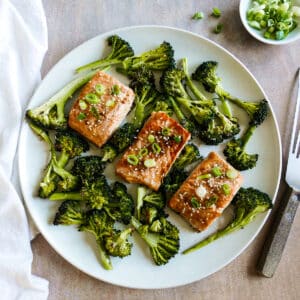
This miso butter salmon is my weeknight shortcut to restaurant-level flavor: a quick miso compound butter melts into a glossy, savory-sweet glaze while the fish stays tender and flaky. It's bold, rich, and ready in about 25 minutes - with no marinating and no fussy steps.

Want to save this recipe?
Enter your email below and get it sent straight to your inbox. Plus, I'll send you easy and delicious recipes every week!
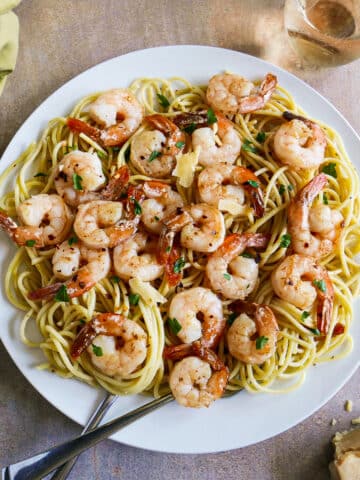
If you've loved my gochujang salmon, spinach stuffed salmon, or mustard dill salmon, this one hits that same weeknight-elegant sweet spot with an even shorter ingredient list.
So you get consistent results at home, I'm sharing three tested methods - pan seared, oven-baked (optional quick broil for caramelized edges), and air fryer - so you can pick what fits your needs.
Bonus: make the miso butter ahead, then use any extra on veggies, noodles, or rice bowls all week!
Jump to:
- ⭐️ Why You'll Love This Miso Butter Salmon
- 🐟 Ingredient Notes
- 📝 Oven-Baked and Air Fryer Miso Butter Salmon (with a Gluten Free Option)
- 🔪 How to Make Pan-Seared Miso Butter Salmon
- 👩🏼🍳 Expert Tips for Perfect Salmon
- 🍚 How to Serve Miso Butter Salmon
- 💬 Frequently Asked Questions
- 🍽 More Seafood Recipes
- Miso Butter Salmon Recipe
⭐️ Why You'll Love This Miso Butter Salmon
- Big flavor, minimal effort: a quick miso-butter glaze melts into the salmon for savory-sweet, umami-rich bites (no marinating required).
- Fast and dependable: on the table in about 25 minutes, with straightforward steps and common pantry ingredients.
- Easy to cook the right way: tips for nailing tender, flaky salmon without drying it out.
- Weeknight or dinner-party worthy: tastes special, but it's simple enough for a regular Tuesday.
- Choose your method: tested pan-seared, oven-baked (optional broil), and air fryer directions included.
🐟 Ingredient Notes

- Salmon fillets - Purchase a center-cut whole fillet of salmon or pre-sliced 4-6 ounce pieces that are of similar size so they cook evenly; you can use skin-on or skinless salmon, but keeping the skin on adds flavor and ensures tender fillets. You can always remove it before serving!
- Unsalted butter - Using unsalted butter allows you to control the amount of salt in your cooking.
- Yellow or white miso - A staple in Japanese cuisine, miso is made from fermented soybeans and brings rich umami flavor (salty and funky!) to a variety of dishes. The paste is typically a mixture of soybeans, a grain (like rice or barley), and salt. Depending on the variety, miso can be light and sweeter (because of a shorter fermentation time) - which is usually sold as white miso - or dark red and much stronger in flavor, sold as red miso.
- Granulated sugar - We need sweetness to balance out the deeply savory and tangy flavor, so don't skip it!
- Rice wine vinegar - You can substitute white wine vinegar or apple cider vinegar for similar results.
- Low-sodium soy sauce - I recommend using low-sodium soy sauce, which lets you control the amount of sodium in your cooking.
- Scallions - Adds a bit of a spicy kick
- Toasted sesame seeds - These are completely optional, but they lend the salmon a slightly nutty flavor and give it a delicate crunch.
📝 Oven-Baked and Air Fryer Miso Butter Salmon (with a Gluten Free Option)
For baked salmon
Preheat your oven to 400 degrees F. Transfer salmon fillets to a lightly greased baking dish and brush half of miso butter mixture on top of salmon.
Bake for 10-15 minutes, until the salmon is mostly opaque and flakes easily (aim for 4 to 6 minutes per half-inch of thickness). Optional: broil for 1-2 minutes at the end to lightly caramelize the miso butter on top.
For accuracy, use an instant-read thermometer; the USDA recommends 145ºF at the thickest part of the fillet.
In air fryer
Preheat your air fryer to 380 degrees F. Brush half of the miso butter mixture on top of salmon fillets, and place them in the air fryer. Cook for 10-12 minutes, until salmon is cooked through with an opaque center.
Make gluten-free
Substitute tamari for the soy sauce to make a gluten-free version. Additionally, check to see if your brand of miso contains fermented wheat or barley, which contain gluten.
🔪 How to Make Pan-Seared Miso Butter Salmon
In a small bowl, mix together the softened butter, miso paste, sugar, vinegar, and soy sauce until well combined.

Use a paper towel to pat the salmon dry, and sprinkle with a pinch of salt & black pepper.

In a large skillet, heat 2 tablespoons of miso butter over medium heat. Add salmon, skin-side up, to the hot pan and cook for 4-5 minutes.

Flip salmon and cook on the other side for another 5 minutes. Transfer to a plate and loosely cover with foil for 5 minutes to let it rest.

Garnish with scallions and sesame seeds, if using. Remaining miso butter can be drizzled on top of fillets for added flavor. Serve with rice, noodles, and/or vegetables.

👩🏼🍳 Expert Tips for Perfect Salmon
- Don't overcook it: Salmon goes from perfect to dry fast, so check the thickest part early and pull from the heat when it flakes easily (or use a thermometer if you want to be extra reliable).
- Add miso butter near the end: Miso (and any sweetener) can brown quickly, so finishing it with the butter glaze keeps it flavorful without scorching if you're placing it under the broiler.
- Pat salmon dry. Be sure to pat dry your salmon fillets before seasoning to get a nice crust when cooking.
- Let it rest. After finished cooking, let your salmon rest for 3-5 minutes. This allows the juices to be absorbed into the meat and not run all over your plate.
🍚 How to Serve Miso Butter Salmon
Salmon with miso butter is a rich and decadent meal, while still quick and easy. I love it paired with rice and some sort of roasted vegetable. Here are some additional suggestions:
- Grains. Serve it over your favorite grain, like rice, quinoa, barley, or farro
- Vegetables. Get your daily intake of veggies by serving it with your favorite vegetable or a light side salad, like apple cucumber salad
- Bread. Pair your salmon and miso with sourdough discard focaccia, dinner rolls, or biscuits
- Noodles. Serve salmon over a bed of soba noodles or udon noodles

💬 Frequently Asked Questions
For food safety, the USDA recommends cooking fish to an internal temperature of 145ºF at the thickest part.
Yes, miso butter can be stored in the fridge in an airtight container for up to 2 weeks.
Yes, frozen salmon works, but for the best texture and browning, thaw it first if you're pan-searing. The safest thaw methods are overnight in the fridge, sealed in a bag and placed in cold water, or you can also defrost in the microwave if you cook it immediately.
In a pinch, it's also safe to cook salmon from frozen, just expect it to take about 1.5x longer, and use a thermometer to check doneness (USDA guidance for fish is 145ºF at the thickest part).
Store leftover salmon in an airtight container and refrigerate promptly; it's best eaten within 3-4 days. If you want to freeze it, wrap it tightly with foil and place in a freezer bag; it can be stored in the freezer for up to 3 months.
To reheat, go low and gentle (low-temp. oven or low-powered microwave) so the salmon stays moist - and for more detail, check out my how to reheat salmon guide. For food safety, reheat leftovers until they reach 165ºF.
That's usually just butter separating as it melts - often because cold soy sauce hits the butter, or the heat was too high (especially under the broiler). It's not unsafe, just not as pretty.
Prevent it: use softened butter, add liquids at room temp., and add miso butter near the end.
Fix it: whisk off the heat; if needed, whisk in 1-2 teaspoons warm water to bring it back together.
For this miso salmon, I recommend white miso. It's the mildest and slightly sweet, so it gives you lots of umami without overpowering the fish.
Yellow miso also works if that's what you have, but expect a deeper, saltier flavor. I don't usually recommend red miso here unless you love a bold, punchy miso flavor; it can taste quite intense in a butter glaze.
Tip: miso brands vary in saltiness, so taste your miso butter and adjust the soy sauce/salt to your liking.
🍽 More Seafood Recipes
Tried this recipe? Please leave a star ⭐️⭐️⭐️⭐️⭐️ rating below and/or a review in the comments section further down the page. You can also stay in touch with me through social media by following me on Instagram, Pinterest, TikTok, and Facebook.
Subscribe to my email newsletter to get a FREE e-book of 15 Healthy Weeknight Recipes, and get new recipes delivered to your inbox every week!
Miso Butter Salmon Recipe
Ingredients
- 4 Tablespoons unsalted butter, softened
- 4 Tablespoons yellow or white miso paste
- 2 Tablespoons granulated sugar
- 2 Tablespoons rice wine vinegar
- 2 Tablespoons low-sodium soy sauce
- 2 scallions, thinly sliced (optional)
- 1 Tablespoon toasted sesame seeds (optional garnish)
- 4 salmon fillets (4-6 ounces each)
- pinch of salt & black pepper
Instructions
- In a small bowl, mix together the softened butter, miso paste, sugar, vinegar, and soy sauce until well combined. (Your butter may curdle if your soy sauce is cold, but that's ok.)
- Use a paper towel to pat the salmon dry, and sprinkle with a pinch of salt & black pepper.
- In a large skillet, heat 2 tablespoons of miso butter over medium heat. Add salmon, skin-side up, to the hot pan and cook for 4-5 minutes.
- Flip salmon and cook on the other side for another 5 minutes. Transfer to a plate and loosely cover with foil for 5 minutes to let it rest.
- Garnish with scallions and sesame seeds, if using. Remaining miso butter can be drizzled on top of fillets for added flavor. Serve with rice, noodles, and/or vegetables.
Notes
- Don't overcook it: Salmon goes from perfect to dry fast, so check the thickest part early and pull from the heat when it flakes easily (or use a thermometer if you want to be extra reliable).
- Add miso butter near the end: Miso (and any sweetener) can brown quickly, so finishing it with the butter glaze keeps it flavorful without scorching if you're placing it under the broiler.
- Pat salmon dry. Be sure to pat dry your salmon fillets before seasoning to get a nice crust when cooking.
- Let it rest. After finished cooking, let your salmon rest for 3-5 minutes. This allows the juices to be absorbed into the meat and not run all over your plate.


Barb says
This recipe sounds delicious and looks easy to prepare!
Caitlin says
This was so easy and delicious!
MaryAnne says
Thanks, Caitlin! So glad you enjoyed it!