

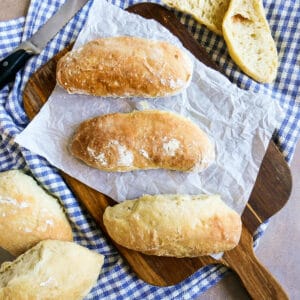
This easy ciabatta rolls recipe makes soft and airy ciabatta with a golden crispy crust. These chewy rolls have a larger crust-to-bread ratio, with an open, airy crumb, so are perfect for toast or sandwiches. Toast your homemade rolls for breakfast and slather them with salty butter and raspberry jam!

Want to save this recipe?
Enter your email below and get it sent straight to your inbox. Plus, I'll send you easy and delicious recipes every week!
I love making sandwiches with ciabatta rolls, like meatless sloppy joes. The open, airy crumb is perfect for holding condiments, and the chewy crispness is just the right texture.
Ciabatta buns are similar to baguettes, but chewier, and are often used to make sandwiches. Ciabatta is set apart from other breads like focaccia by it's high hydration dough (80% water-to-flour ratio), which creates the large bubbles.
There is also no fat used, so the bread is chewy with a crispy crust. This makes the ciabatta perfect for making bruschetta or sopping up the sauce or marinade in your favorite saucy dish!
Jump to:
👩🏼🍳 Why These Ciabatta Rolls are the Best
- Rustic Italian bread with a soft and airy interior, and a chewy and crispy exterior
- Easy ciabatta bun recipe for beginner bread-makers; homemade rolls are ready in 4 hours and no special equipment is needed
- More crust-to-bread ratio, which makes ciabatta rolls perfect for toast or making sandwiches
- Just 4 simple pantry-friendly ingredients
- Naturally dairy-free and vegan
- Freezer-friendly recipe
🤔 What Makes Ciabatta Different from Bread?
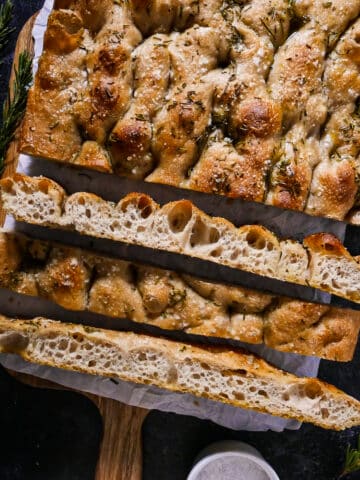
Ciabatta is a classic Italian bread, known for its rustic appearance and chewy texture. Ciabatta differs from conventional bread due to its unique texture and flavor. Because its made with a high hydration dough, the result is an airy and open crumb with large holes and a chewier texture.
In addition, ciabatta's crust is thinner and crisper than conventional bread. This is due largely to the steam bath that is created when the ciabatta rolls are baked in the oven, and it offers a nice contrast to the soft interior.
Because of its airy interior and crispy exterior, ciabatta is considered an excellent bread for making sandwiches. Let's get started!
🍞 Ingredient Notes

- Instant yeast - Always check the expiration date on your instant yeast. We want to use fresh yeast that has not been previously opened and that has not expired.
- Room temperature water - Using room temperature/lukewarm water helps our yeast do its thing. If the water is too hot, it will kill the yeast, so use your finger to gauge water that feels slightly warm to the touch.
- Bread flour - Contains high levels of gluten and protein, which helps to create an airy and chewy texture. You can use all-purpose flour, but your ciabatta rolls might not be as light and airy.
- Salt - Helps to bring out the flavors and aroma. Don't skip it!
📝 Variations & Substitutions

- For smaller slider rolls, cut into 8 pieces.
- Flour. Using bread flour is ideal. You can use all-purpose flour, but bread flour will produce better results, as it contains higher levels of gluten, which produces bread that has an airy and chewy texture.
🔪 How To Make Ciabatta Rolls
*See recipe card below for printable instructions
There is no kneading involved here, but we do give our dough a series of stretch-and-fold exercises (over the course of 2 hours) to help develop the gluten, which creates the air bubbles. There is also a resting period (totaling 1 hour and 40 minutes), which helps to develop the flavor.
In a small bowl, dissolve instant yeast in room temperature/lukewarm water. Stir to combine, and let it sit for 2-3 minutes. The mixture should create small bubbles.


In a large mixing bowl, combine bread flour and salt. Pour in yeast mixture and stir until well-combined using a fork or large spoon. Make sure you scrape down sides of bowl so that there are no bits of flour or dough left behind. Your dough will be very wet and sticky.
Cover the bowl with plastic wrap and let it rest at room temperature for 1 hour. Depending on the temperature of your kitchen, this may take less or more time.

Wet your hands and begin the stretch-and-fold process: Grab one edge of your dough and stretch it up and then towards the center of the dough. Rotate bowl and repeat this process with all four sides of your dough. It shouldn't take more than 1 minute to fold all 4 sides. Cover with plastic wrap and let dough rest for 30 minutes.


Repeat this step 3 more times, every 30 minutes, for a total of 4 stretch-and-folds (totaling 2 hours). Your dough should be doubled in size after this step.

Shape your dough: Transfer dough to a floured surface. Sprinkle top of dough with a small amount of flour and shape it into a rectangle by gently pulling the dough from underneath. Place parchment paper on a baking sheet and sprinkle generously with all-purpose flour.
Divide into rolls: Roll the dough into a log and press the edge to seal. Divide the rolled dough into 4 equal parts (or 8 if you are making slider rolls) using a bench scraper or bread knife, and place each piece onto floured baking sheet. Let the dough rest uncovered for 40 minutes.


Fill a large baking pan with water and place it in the bottom of your oven. Preheat the oven to 420 degrees F, and allow it to create a steam bath in your oven.
Spritz rolls with water and bake for 20-25 minutes, until golden brown and nicely crisp on the outside. Let rolls cool completely on a wire rack before serving.

⏲ Expert Tips
- Use fresh instant yeast that has not expired. Don't use an already opened package of yeast, and always check the expiration date on yeast before using.
- Add steam to your oven. Place a baking pan with water on the bottom of the oven. This helps to create a crispy crust on your rolls. If you can, try and place it slightly off to the side so that it's not directly underneath the rolls while baking.
- Your yeast mixture should become bubbly and foamy. If this does not happen, double check the expiration date on your yeast, and try again with a new packet of yeast.
- Use a bench scraper or large, firm spatula. Because the dough is very wet and sticky, we need a tool to help us handle and transfer the dough.
- Use a generous amount of flour on your work surface.
- Weigh your ingredients using a (digital) kitchen scale. This ensures accuracy when baking. It's not necessary, but very helpful.
- Storage: Store in an airtight container in the refrigerator for up to 5 days. Because these rolls are super fresh and don't contain any preservatives, storing them on the counter is not advisable.
- How to freeze: Place in a freezer-safe bag and store for up to 3 months. To thaw, place in fridge overnight.
- To re-crisp: Place in a preheated 350 degree F. oven for 5 minutes.
🥪 How To Serve Ciabatta Rolls
- Toast ciabatta buns for breakfast and slather with your favorite freezer jam.
- Make breakfast sandwiches. Make a hearty breakfast sandwich with my vegetarian frittata.
- Make savory sandwiches. Use your rolls for a variety of sandwiches, like paninis, lentil sloppy joes, chickpea "egg" salad sandwiches, veggie BLT, and portobello burgers.
- Serve with a main course, and sop up any leftover sauce, like my salmon with mustard dill sauce.
💬 Frequently Asked Questions
Focaccia has a lighter, spongier texture and is baked as a flatbread. Ciabatta, on the other hand, has a denser, chewier texture, which makes it a great bread to make sandwiches with.
Like many other types of bread, they are healthy when eaten in moderation.
Ciabatta rolls are known for having a hard crust with a denser, chewier interior. This makes them ideal for making sandwiches and toasting for breakfast.
Because of its higher hydration dough, the interior of ciabatta has an open and airy crumb, with large holes. In contrast the crust is thinner and crispier, creating a delicious contrast and the perfect sandwich bread.
🥖 More Bread Recipes

Tried this recipe? Please leave a star ⭐️⭐️⭐️⭐️⭐️ rating below and/or a review in the comments section further down the page. You can also stay in touch with me through social media by following me on Instagram, Pinterest, TikTok, and Facebook.
Subscribe to my email newsletter to get a FREE e-book of 15 Healthy Weeknight Recipes, and get new recipes delivered to your inbox every week!
Chewy Ciabatta Rolls Recipe
Equipment
- 1 large baking sheet
- 1 large baking pan
Ingredients
- 1 teaspoon instant yeast
- 240 grams room temperature water (approximately 1 cup + 1 Tablespoon)
- 300 grams bread flour (approximately 2 ¼ cups)
- 1 teaspoon salt
Instructions
- In a small bowl, dissolve instant yeast in room temperature/lukewarm water. Stir to combine, and let it sit for 2-3 minutes. The mixture should create small bubbles.
- In a large mixing bowl, combine bread flour and salt. Pour in yeast mixture and stir until well-combined using a fork or large spoon. Make sure you scrape down sides of bowl so that there are no bits of flour or dough left behind. Your dough will be very wet and sticky.
- Cover the bowl with plastic wrap and let it rest at room temperature for 1 hour. Depending on the temperature of your kitchen, this may take less or more time.
Stretch and Fold:
- Wet your hands and begin the stretch-and-fold process: Grab one edge of your dough and stretch it up and then towards the center of the dough. Rotate bowl and repeat this process with all four sides of your dough. It shouldn't take more than 1 minute to fold all 4 sides. Cover with plastic wrap and let dough rest for 30 minutes.
- Repeat this step 3 more times, every 30 minutes, for a total of 4 stretch-and-folds (totaling 2 hours). Your dough should be doubled in size after this step.
Shape the dough:
- Transfer dough to a floured surface (your dough will be very sticky). Sprinkle top of dough with a small amount of flour and shape it into a rectangle by gently pulling the dough from underneath. We want to be very gentle during this step so as not to deflate our air bubbles that we just spent time creating.
- Place parchment paper on a baking sheet and sprinkle generously with all-purpose flour.
- Roll the dough into a log and press the edge to seal. Divide the rolled dough into 4 equal parts (or 8 if you are making dinner rolls) using a bench scraper or bread knife, and place each piece onto floured baking sheet (using a bench scraper or sturdy spatula will help with this step). Let the dough rest uncovered for 40 minutes.
Bake the rolls:
- Fill a large baking pan with water and place it in the bottom of your oven. Preheat the oven to 420 degrees F, and allow it to create a steam bath in your oven.
- Spritz rolls with water (not necessary but will help them along) and bake for 20-25 minutes, until golden brown and nicely crisp on the outside. Let rolls cool completely on a wire rack before using.
Notes
- Add steam to your oven. Place a baking pan with water on the bottom of the oven. This helps to create a crispy crust on your rolls. If you can, try and place it slightly off to the side so that it's not directly underneath the rolls while baking.
- Your yeast mixture should become bubbly and foamy. If this does not happen, double check the expiration date on your yeast, and try again with a new packet of yeast.
- Weigh your ingredients using a (digital) kitchen scale. This ensures accuracy when baking. It's not necessary, but very helpful.
- Storage: Store in an airtight container in the refrigerator for up to 5 days. Because our rolls are super fresh and don't contain any preservatives, storing them on the counter is not advisable.
- Recipe adapted from Ahead of Thyme.


Danielle says
My daughter and I made these as a science project - she especially enjoyed stretching the dough! We ate them for toast the next morning and they were delicious!
Gastronotherapy says
What a great idea, Danielle! I'm so glad you and your daughter enjoyed them! 😍