
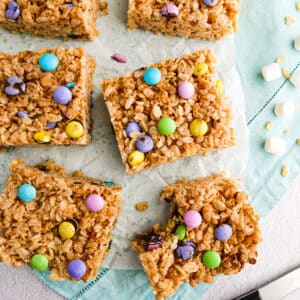
These soft and chewy M&M Rice Krispie treats are loaded with chocolatey M&M's, making them colorful, kid-friendly, and delicious. These Rice Krispie bars are an easy (ready in 10 minutes) and delicious treat perfect for game night or a celebration!

Want to save this recipe?
Enter your email below and get it sent straight to your inbox. Plus, I'll send you easy and delicious recipes every week!
I can't decide if my favorite thing about making homemade Rice Krispie treats is the fact that they are so easy to make, their soft and chewy texture, or that they always remind me of childhood. Maybe it's all of the above!
If you remember hard and crunchy bars from back in the day, these are not those, my friend. This version of Rice Krispie treats uses less cereal, so the bars are sticky and gooey, with a slightly crunchy texture, and loaded with colorful M&M's for a chocolaty bonus (use holiday colors for themed festivities!).
Jump to:
⭐ Why This Recipe is the Best
- Easy - Rice Krispie treats are one of the easiest recipes to make when you want a sweet treat: You simply melt butter and marshmallows on your stovetop, stir in the rest of the ingredients, and you're done in 5 minutes!
- Fun, nostalgic and kid-friendly - Who doesn't like Rice Krispie bars? They are loved by kids and adults, and remind us of our childhood. By adding M&M's, we make them bright and colorful and that much more fun.
- Taste - Buttery, sweet, with a pinch of salt, and chocolate candies sprinkled throughout, they are the perfect snack or light dessert.
- Texture - Soft and chewy, sticky and gooey, slightly crunchy; their texture is part of what makes them so much fun to eat!
👩🏻🍳 Ingredient Notes

- Crispy rice cereal - Use your favorite brand of crispy rice cereal.
- Butter - We use unsalted butter in this recipe so that we can control the amount of salt used. If you only have salted butter available, omit the added salt.
- Mini-marshmallows - To make things very easy, we use one 10 ounce bag of mini-marshmallows. If you want to use regular size, the equivalent is about 40 marshmallows. Use them to make my chocolate chip marshmallow cookies!
- Salt - Don't skip this step! We always need a small amount of salt in our sweets to heighten the overall flavor.
🔪 How To Make M&M Rice Krispie Treats
*See printable instructions in recipe card below.
Prepare pan: Grease a 9"x13" baking dish with non-stick cooking spray or line with parchment paper.
In a large saucepan, melt better over low heat until melted.


Add mini-marshmallows; stir until completely melted and incorporated into butter.

Add the cereal, vanilla extract, and salt, and stir until mixed thoroughly. Let stand to cool for 3-4 minutes.


Add m&m's: Stir in m&m's, working quickly. Transfer mixture into prepared baking dish and press down gently using parchment paper or wax paper (or spray your hands lightly with non-stick cooking spray).
Let the treats cool for at least 30 minutes before cutting and serving. Store in an airtight container at room temperature.

💭 Expert Tips and Tricks
- Melt butter and marshmallows over low heat. This helps to avoid your bars from becoming hard. We want chewy squares.
- This recipe uses a 9"x13" pan. However, you can halve the recipe and use an 8"x8" pan as well.
- Microwave method: Melt butter and marshmallows in the microwave in 30-second intervals until completely melted.
- Use fresh marshmallows for optimal melting.
- Press gently into pan to keep them soft and chewy. You can use a piece of wax or parchment paper to do this, or spray a bit of non-stick cooking spray on your hands.
- How to store: Place in an airtight container at room temperature for up to 5 days. It's not necessary to refrigerate them, although you can stick them in the fridge for 5-10 minutes to speed up the cooling process. However, placing your treats in the refrigerator long term will cause them to become hard, so I don't recommend this.
- How to freeze: Place your bars in a freezer-safe container and use parchment paper to separate the layers. They can be stored in the freezer for up to 2 months.
- For easy removal, line your baking dish with parchment paper.

🥨 Rice Krispie Flavor Variations
- Peanut butter: Add ½ cup of peanut butter when you add the marshmallows.
- Pretzels: Stir in ½ cup of pretzels when you stir in your m&m's.
- Snickers, Twix, or your favorite candy bar: Stir ½ cup of (chopped) candy bar into treats in addition to the M&M's or in place of them.
- Peppermint. Make minty chocolate treats by adding ½ cup of chopped peppermint bark.
- Peanut m&m's: Adds a delicious nutty crunch!
- Holiday m&m's: Use holiday colors for Easter, Halloween, Christmas, etc. to make themed treats.
💬 Frequently Asked Questions
Too much butter (and marshmallows) can lead to them becoming soggy. If you use the ratio called for in this recipe, they should be soft and chewy, but never soggy.
Most likely, you are not using fresh marshmallows. It's really important to use fresh marshmallows for this recipe, as they will melt easily and lead to soft and gooey treats.
According to the Kellogg's website, Rice Krispies are made with malt, which comes from barley and may contain gluten. However, you may be able to find other brands of rice cereal that are in fact gluten-free.
🍪 Related Recipes


Tried this recipe? Please leave a star ⭐️⭐️⭐️⭐️⭐️ rating below and/or a review in the comments section further down the page. You can also stay in touch with us through social media by following us on Instagram, Pinterest, TikTok, and Facebook.
Subscribe to my email newsletter to get a FREE e-book of 20 vegetarian recipes, and get new recipes delivered to your inbox every week!
M&M Rice Krispie Treats Recipe
Ingredients
- 4 Tablespoons butter, unsalted
- 1 10-ounce bag mini-marshmallows (or 40 regular size)
- 6 cups Rice Krispies cereal
- 1 teaspoon vanilla extract
- ½ teaspoon salt
- 1 cup M&M's
Instructions
- Grease a 9"x13" baking dish with non-stick cooking spray or line with parchment paper.
- In a large saucepan, melt better over low heat until melted.
- Add mini-marshmallows; stir until completely melted and incorporated into butter.
- Add the cereal, vanilla extract, and salt, and stir until mixed thoroughly. Let stand to cool for 3-4 minutes.
- Stir in M&M's, working quickly (M&M's shouldn't melt at this point, but if they do, it's fine.)
- Transfer mixture into prepared baking dish and press down gently using parchment paper or wax paper (or spray your hands lightly with non-stick cooking spray).
- Let the treats cool for at least 30 minutes before cutting and serving. Store in an airtight container at room temperature.
Video
Notes
- Melt butter and marshmallows over low heat. This helps to avoid your treats from becoming hard. We want soft and chewy squares.
- Press treats gently into pan to keep them soft and chewy. You can use a piece of wax or parchment paper to do this, or spray a bit of non-stick cooking spray on your hands.
- Storage: Place in an airtight container at room temperature for up to 5 days. It's not necessary to refrigerate them, although you can stick them in the fridge for 5-10 minutes to speed up the cooling process. However, placing your treats in the refrigerator long term will cause them to become hard, so I don't recommend this.
- How to freeze: Place your bars in a freezer-safe container and use parchment paper to separate the layers. They can be stored in the freezer for up to 2 months.
R K
I have a Pavlovian response to the words "Rice Krispie treats" !!! Ooops, just shorted out my keyboard with drool!!
Gastronotherapy
Funny, RK! Thanks for stopping by my site! 🙂
Barb Haner
I will be making these as soon as I get some marshmallows in my pantry. I will definitely have to use the freezer storage option or they will be gone too quickly!
Gastronotherapy
Haha, yeah I also have to use the freezer storage option! 😉
Nancy
So soft and chewy, and I love the addition of m&m's to the mix! I actually used peanut m&m's, and it was hard to stop eating them!!
MaryAnne
Thanks, Nancy! Peanut M&M's would be delicious!