

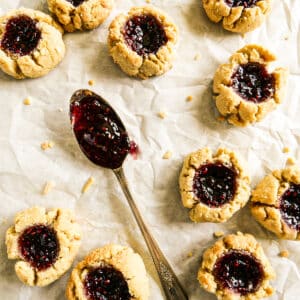
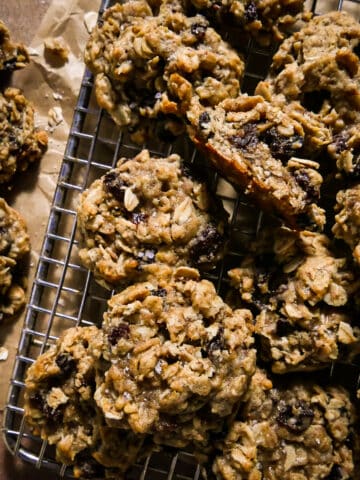
Gluten free thumbprint cookies with tender, jammy centers and crisp edges--made with almond flour for a naturally rich, buttery bite (no gluten-free flour blend needed). This easy vegan thumbprint cookie recipe comes together in one bowl with 6 simple ingredients and is ready in about 30 minutes, perfect for holiday cookie trays or anytime you're craving a quick, classic cookie!

Want to save this recipe?
Enter your email below and get it sent straight to your inbox. Plus, I'll send you easy and delicious recipes every week!
I've been making some version of these thumbprints for years, and I've tested this almond-flour, vegan version enough times to know exactly what makes it reliably great: the dough is easy to handle, holds its shape, and bakes up consistently every single time.
But the real reason I keep coming back to these gluten-free thumbprint cookies is the flavor and texture--almond flour gives you that tender, buttery bite (like in my almond flour peanut butter cookies), the edges turn lightly crisp, the centers stay tender, while a touch of almond extract makes the jam taste even fruitier.
No rolling out or chilling dough, no special equipment needed, 6 simple ingredients, and only 10 minutes of prep time. Pair them with a cup of coffee for a delicious treat, especially during the holidays!
Jump to:
- ⭐️ Why This Thumbprint Cookie Recipe Works
- 🍪 Cookie Ingredient Notes
- 📝 Thumbprint Cookie Variations & Substitutions
- 🔪 How to Make Gluten Free Thumbprint Cookies
- 👩🏼🍳 Make Ahead, Storage, and Freezing Tips
- 👩🏼🍳 Expert Tips for Perfect Thumbprint Cookies
- 💬 Frequently Asked Questions
- 🍽 More Gluten Free Cookie Recipes
- Gluten Free Thumbprint Cookies Recipe
⭐️ Why This Thumbprint Cookie Recipe Works
- Soft, chewy centers & crisp-tender edges
- Jammy thumbprints that hold their shape (no fussy dough-rolling)
- One-bowl, 6 ingredients, no chilling, and just 10 minutes of hands-on time
- Naturally gluten free & vegan (no eggs, no dairy)
- Easy to customize with any jam (apricot, strawberry, etc.)
🍪 Cookie Ingredient Notes

- Pure maple syrup - Adds caramel-y sweetness and keeps the dough tender.
- Almond extract - Makes the fruit filling pop. (Try it in my almond cupcakes with raspberry buttercream, almond poppy seed muffins with almond paste streusel, and apricot gluten free galette.
- Almond flour - Use fine blanched almond flour for the least gritty texture (almond meal will taste "coarser").
- Jam/preserves- Thick jam is easiest to portion. If yours is a bit stiff, warm it up for 5-10 seconds in the microwave to loosen it up.
- Slivered almonds - Optional, but adds a nice subtle crunch.
📝 Thumbprint Cookie Variations & Substitutions
- Canola oil. Substitute coconut oil or vegan butter for the canola oil. And if you don't need these cookies to be vegan, go ahead and use real butter.
- Maple syrup. Honey can be used in place of maple syrup, or see my list of the best maple syrup substitutes.
- Preserves. Use your favorite flavor of fruit preserves.
- Gluten-free flour. I have not recipe-tested these cookies using all-purpose gluten-free flour. If you do use it, I recommend adding one or two additional tablespoons of oil to your dough, as the all-purpose flour contains less moisture.
🔪 How to Make Gluten Free Thumbprint Cookies
*See recipe card below for a printable recipe option.
Preheat to 350 degrees F. Line a baking sheet with parchment paper.
In a medium bowl, whisk together the canola oil, maple syrup, vanilla extract, and almond extract. Add the almond flour and salt, and mix thoroughly using a rubber spatula, until the mixture turns into a soft dough. Mixture will be slightly crumbly.
Let the dough sit 2-3 minutes after mixing so the almond flour fully hydrates-this makes the dough easier to roll and less prone to cracking.

Pour crushed almonds into a small bowl and set aside.

Use a tablespoon measure to scoop out dough, and roll each portion into a ball using your hands. If your kitchen is warm, pop the dough balls in the freezer for 10 minutes (it helps the thumbprints stay neat), then roll each ball into crushed almonds and place onto baking sheet, spacing 2" apart.


Using your thumb or the back of a ½ teaspoon measuring spoon, make a deep indent in center of each ball. Fill each indent with ½ teaspoon of jam.

Bake cookies until lightly golden, 12-15 minutes. Transfer to wire racks and let cool.

👩🏼🍳 Make Ahead, Storage, and Freezing Tips
Storage
Store cooled cookies in an airtight container at room temperature for 3-4 days. If your kitchen runs warm, store them in the fridge, but bring them to room temp before serving for the best texture.
Freezing
Freeze baked cookies (fully cooled) in an airtight container or freezer bag-with parchment paper between layers-for up to 2 months. Thaw at room temperature for 30-60 minutes.
Make-ahead
You can make the dough up to 24 hours ahead of time and keep it covered in the fridge. When ready to bake, let it sit at room temp for 10-15 minutes so it's easy to scoop, then shape, indent, fill, and bake.
To freeze the dough, shape into balls (without jam) until firm, transfer to a freezer bag, then bake from frozen. Indent and fill with jam, and add 1-2 minutes to the baking time, as needed.
👩🏼🍳 Expert Tips for Perfect Thumbprint Cookies
- Use fine blanched almond flour (not almond meal) for the most tender, non-gritty texture.
- Let the dough sit 2-3 minutes after mixing so the almond flour fully hydrates; this makes the dough easier to roll and less prone to cracking.
- Press the indent deep (a ½ teaspoon measuring spoon is perfect). Shallow wells tend to puff back up and squeeze out the jam.
- Fix cracks before filling: if the edges split when you press the thumbprint, just pinch the dough back together with your fingers.
- Cool the dough cool for the best shape: if your kitchen is warm, freeze the shaped balls for 10 minutes before filling and baking.
- Warm thick jam for clean filling: if your jam is stiff, warm it in the microwave for 5-10 seconds so it spoons neatly without tearing the dough.
- Don't overfill: about ½ teaspoon jam per cookie keeps the centers tidy and prevents spillover.
- Bake just until the edges look set: almond-flour cookies can go from perfect to dry fast; pull them out of the oven when the edges are lightly golden and let them finish setting as they cool.
💬 Frequently Asked Questions
Two things help most: make a deeper indent than you think (a ½ teaspoon measuring spoon works perfectly), and bake with cool dough. If your kitchen is warm or the dough feels soft/oily, freeze the shaped balls for 10 minutes before adding jam. Also avoid overfilling-about ½ teaspoon jam per cookie keeps the centers neat.
Yes! For baked cookies, cool completely, then freeze in an airtight container with parchment between layers for up to 2 months. For dough, you can shape the balls and freeze on a baking sheet until firm, then transfer to a freezer bag. When ready to bake, indent, fill, and bake from frozen-just add 1 to 2 minutes to the bake time as needed.
A little cracking is normal with almond-flour dough-especially when you press the indent. If you see cracks, just pinch the dough back together with clean fingers before filling. If the dough feels dry/crumbly, let it sit for 2-3 minutes after mixing so the almond flour fully hydrates, then shape again.
🍽 More Gluten Free Cookie Recipes


Tried this recipe? Please leave a star ⭐️⭐️⭐️⭐️⭐️ rating below and/or a review in the comments section further down the page. You can also stay in touch with me through social media by following me on Instagram, Pinterest, TikTok, and Facebook.
Subscribe to my email newsletter to get a FREE e-book of 15 Healthy Weeknight Recipes, and get new recipes delivered to your inbox every week!
Gluten Free Thumbprint Cookies Recipe
Ingredients
- ¼ cup canola oil
- 3 Tablespoons pure maple syrup
- 1 teaspoon vanilla extract
- 1 teaspoon almond extract
- 2 cups almond flour
- ½ teaspoon salt
- ⅓ cup slivered almonds, crushed (optional)
- ¼ cup raspberry preserves (or your favorite jam)
Instructions
- Preheat to 350 degrees F. Line a baking sheet with parchment paper.
- In a medium bowl, whisk together the canola oil, maple syrup, vanilla extract, and almond extract. Add the almond flour and salt, and mix thoroughly, using a rubber spatula, until the mixture turns into a soft dough. (Mixture will be slightly crumbly). Let the dough sit 2-3minutes after mixing so the almond flour fully hydrates-this makes the dough easier to roll and less prone to cracking.
- Pour crushed almonds into a small bowl and set aside.
- Use a tablespoon measure to scoop out dough, and roll each portion into a ball using your hands. If your kitchen is warm,pop the dough balls in the freezer for 10 minutes (it helps the thumbprints stay neat), then roll each ball into crushed almonds and place onto baking sheet, spacing 2" apart.
- Using your thumb or the back of a ½ teaspoon measuring spoon, make a deep indent in center of each ball. Fill each indent with ½ teaspoon of jam.
- Bake cookies until lightly golden, 12-15 minutes. Transfer to wire racks and let cool.
Notes
- If cookies crack around the edges after indenting them, use your fingers to pinch them together before baking.
- Storage: Store in an airtight container at room temperature for up to 4 days, or in the refrigerator for up to 7 days.
- Let cookies rest after removing from the oven. This is very important as almond flour is quite delicate; you need to let the cookies firm up before transferring them to a cooling rack.

Corinne says
I am new to vegan baking and found these on Pinterest. Do all vegan baked goods taste this good?? I used apricot jam since that is what I had on hand. My kids had no idea that they were vegan and gluten free and couldn't stop eating them!
Gastronotherapy says
Lol, I'm not sure that ALL vegan baked goods taste good, but I'm so glad you enjoyed these cookies, Corinne! I love that you used apricot jam - I will have to try that! And no need to tell your kids what is in these cookies! 😉
Naomi says
I can't stop eating them! So much buttery flavor despite being vegan with a nice soft texture. Next time I will double the recipe.
MaryAnne says
So glad you loved them, Naomi! They're one of my favorites to make for Christmas. 🙂